Menu Path: Admin > Company Prerequisites > Data Import Manager
Note: A list of suppliers can be imported using Import Manager from a predefined Excel template.
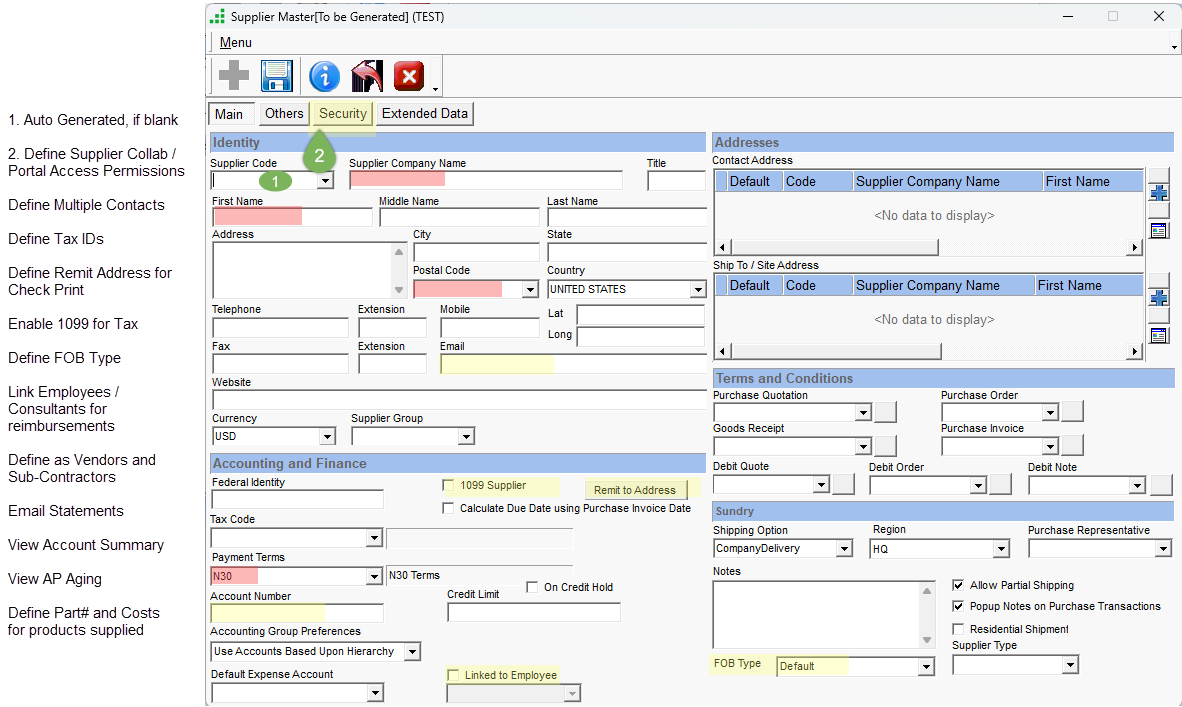
Every enterprise purchases goods, services, assets, or office supplies from its Suppliers. Accounts Payable pays these Suppliers on time (taking advantage of payment discounts if possible) while avoiding duplicate payments and bank overdrafts. Accounts Payable is the last step in the supply chain where Purchasing is the first. Accounts Payable accepts Invoices, selects Invoices to be paid, generates checks, and forecasts future cash requirements based on due dates.
Supplier information is the master data used by Accounts Payable. It contains information about the enterprise’s Suppliers and other Creditors. Information about the Supplier, its Regions, Contacts, etc. These tables are also used by Purchasing.
2. Supplier Code
Every Supplier is assigned a unique Supplier code. This code can be auto-generated by the system or can be defined by the User.
You cannot save a new Purchase Transaction unless you select a Supplier Code.
2. Supplier’s Billing Address
The Supplier’s billing address is displayed below the Supplier field in all Purchase/Purchase Return Transactions. This is mandatory information for every Supplier.
To modify the Supplier’s billing address, you must change the billing address in the Supplier’s Master. If you have created a final transaction for the Supplier, select the Supplier code once again on the Purchase/Purchase return transaction to view the changes made.
Adequate security right is required when accessing the Supplier’s region/sub-region that is different from logged-in region.
3. Supplier’s Contact Address
The Contact field displays the address of the person who is to be contacted for matters relating to the purchase transaction.
When you select the Supplier code, the default contact address specified in the Supplier Master is displayed in the purchase transaction.
You can change the contact address. Defining this address indicates the name and address of the person responsible for the fulfillment of the purchase transaction.
OnCloud also allows you to select a billing, contact, shipping or return address of any other Supplier or customer from the Addresses list. This feature is useful in case the Supplier has group companies. You can select a customer’s contact address if the Supplier is also your customer.
4. Ship to Address / Return Address
The Ship To field specifies the address to which the Supplier must ship the products ordered. For return transactions this field displays the address to which you must ship the returns.
When you select a Supplier code in a transaction, the default Ship To address specified in the Supplier master is displayed in the Purchase Transaction.
If a default address is not defined in the Supplier master, this field will be blank. You can change the Ship To address.
When the shipping address is not defined for a Purchase or Purchase return transaction, the system prints the transaction’s region address in place of the shipping address.
For Purchase Return transactions, when you select a Supplier code, the default Return address specified in the Supplier master is displayed in the Purchase Transaction.
5. Supplier Notes
You can attach notes to a Supplier master to keep track of information pertaining to the Supplier. You can also set up preferences to automatically pop up the notes attached to a particular Supplier by selecting the Pop up Comments on transaction option. It is recommended that you select this option only if you always want to view the comments before selecting a Supplier on a transaction.
User Interface Navigation for Supplier List and Master
The various actions that can be performed on the Supplier List and the quick access icons present in the Supplier List are similar to the Product List page.
Menu options in the SupplierList
Option Shortcut Action
My Suppliers – When this option is selected, only the Supplier of the Logged User gets listed
All Suppliers
When this option is selected, all the Supplier of all the User gets listed
New
Ins
To create a new Supplier
Modify
Enter
To edit the existing Supplier details
Task Manager
To create Appointment, Task, Incoming call, and Outgoing calls and to view the Appointment and the Task List
Transactions
To view various Purchase and Debit Transaction for the selected Supplier
Ship To/ Site Addresses
Shift+Alt+S
To view the Shipping Addresses of the selected Supplier
Contact Addresses
Shift+Alt+A
To view the Contact Addresses of the selected SuppLier
Aging
Ctrl+A
To view the Supplier Aging details
Account Summary
Ctrl+T
To view the Account Summary of the selected Supplier
GL Transaction
Ctrl+L
To view the Supplier Ledger
Assign Rights
To Assign appropriate Rights to the Supplier
Export List
To export the Supplier List
Print List
To Print the Supplier List
Hide
Del
To hide the selected Supplier
View Hidden
F4
To view the hidden Supplier
View Image
Ctrl+Alt+I
To view the Supplier image
View Notes
Ctrl+Alt+W
To view the Supplier Notes
View Employee
To list the Suppliers linked to an Employee
Extended Data
Ctrl+F
To view the Supplier Extended Data
Column Filtering
Ctrl+Alt+F
To display the Supplier by applying the column filtering
Columns
To view the additional columns that can be added to the Supplier List
Grouping
To expand or collapse the grouping
Close
Ctrl+F4
To close the window
Supplier Master
To create a new Supplier, click (+) sign or use ‘Insert’ key on keyboard from the Supplier List. You can also go to Menu and select ‘New’.
In the Supplier Master there are multiple tabs under which you can enter the data based on your business requirement.
General: Enter the Supplier Code, Supplier Company Name, First Name. Middle Name, Last Name, Address, Telephone number, Currency, Supplier Group and other details.
Addresses: You can add multiple Contact and Shipping Address for the Supplier. You can set one of the addresses as the default address.
Finance: Enter the Tax Code, Payment Terms, Accounting Details etc.
Terms: Select the Terms and conditions for each transaction.
Sundry: Enter the details such as Shipping option, Region, Purchase Representative, FOB Type, Notes and other details.
Others: Enter the supplier UEN/ GST details and the partner details.
Security: Enter the Password and the security question that can be used during online login. Option to Enable Web access login is also available.
Extended Data: Enter additional data to the Customer based on your requirement.
Quick access icons in the Supplier Master
These are similar to the quick access icons in the Product Master.
Who are the User Personas that need this?
Creating a new Supplier
Creating a new Supplier would involve entering some of the basic details about your Supplier, such as Company Name, Address, Contact Details, and some additional details related to Payment Terms (to be hyperlinked, connecting to Payment Terms master section), Shipping Option and Accounting Group (to be hyperlinked, connecting to Accounting Groups master section).
Steps:
1. Go to Path > Main menu> Purchases > Masters> Suppliers.
2. On the Supplier List click (+) sign or use ‘Insert’ key on your device keyboard to create a new Supplier. You can also go to Menu and select ‘New’.
3. On the ‘Supplier master [To be generated]’ screen > Main tab, enter Supplier Code, Supplier Company Name, Address, Telephone, Mobile Phone Number, Email, Website address. Do not enter anything in the Supplier Code field if you wish you auto generate a numerical code based on your Region (to be hyperlinked, connecting to Regions master section) settings.
Country will be filled automatically based on your Company address; you can change though. Select Postal Code from the prefilled drop box list if your Supplier is from United States of America. City and State values will get auto filled based on the Postal Code. GreeneStep provides latest list of Postal Codes as per USPS (to be hyperlinked, connecting to USPS website). Enter Postal Code, City and State values manually for Suppliers from other Countries.
4. Select Supplier native Currency or Supplier preferred Transaction Currency from the drop box.
5. Select Supplier Group from drop box.
You can add separate Contact Address and Ship To / Site Address for the Supplier if needed. Click on the Addresses tab, you will be displayed 2 sections, the upper section for Contact address and lower one for Ship To address. Click on Plus button in the Contact Address section, fill the details similar to the Main tab, and click on Save button on the tab. Repeat the steps for Ship To / Site address.
You can add more than address based on your need.
6. Click on the Finance tab, enter Payment Terms by selecting value from the drop box.
In the Accounting Group section > Accounting Group Preferences field you can change pre-populated option from the drop box. If you select Accounting Group (to be hyperlinked, connecting to Accounting Groups master section) by selecting as the option, then you needed to select the same from adjacent drop box.
If you select Specify Accounts as the option, then you need to on the adjust button and select specific Accounting Codes (to be hyperlinked, connecting to Chart of Accounts master) for each of the Purchase Control Account displayed on the screen.
7. Click on the Sundry tab, select Shipping Option from the drop box
Select Purchase Representative from the drop box. A Purchase Representative will be one amount the Users (to be hyperlinked, connecting to Users master) of your Company.
Enter any pertinent information related to the Supplier In the ‘Notes’ edit box.
You can also choose to bring up some of the above details by default (provide a link to a section which explains what is default), by entering them in the Region’ s master. The selected values will then appear automatically when you create a new Supplier in that Region.
Navigate to the other tabs and enter the data or modify the default selection that appears in the respective fields by selecting from specific drop boxes. Please click on the link “..” .
Save the Master and close the screen by clicking on ‘X’ button on the menu buttons bar or by clicking on Menu > Close option. You can also press Ctrl + F4 on your device keyboard
You can view the newly created Supplier on the above-mentioned Suppliers List browser. Click on the ‘Refresh’ button on the menu buttons bar and search (provide a separate section for common, but most useful features such as Search, Tree View, Columns Drag and Drop etc., which are Browser /List screen properties) for the Supplier.
How to Create Payment Terms for a Vendor/Supplier
Table of Contents
- Creating a New Payment Term.
- Applying the Payment Term to the Vendor.
Creating a New Payment Term
Step 1: Go to Finance > Masters > Payment Terms.
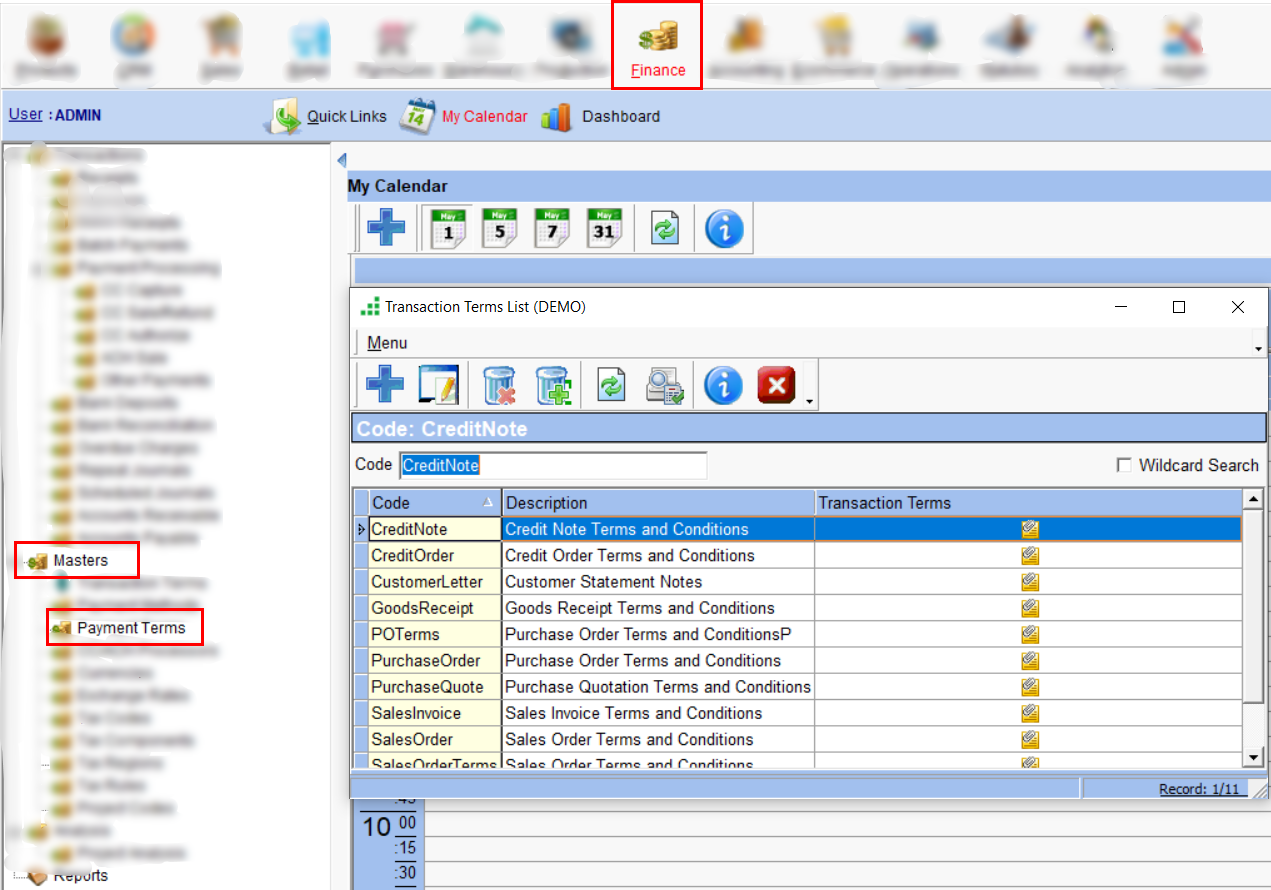
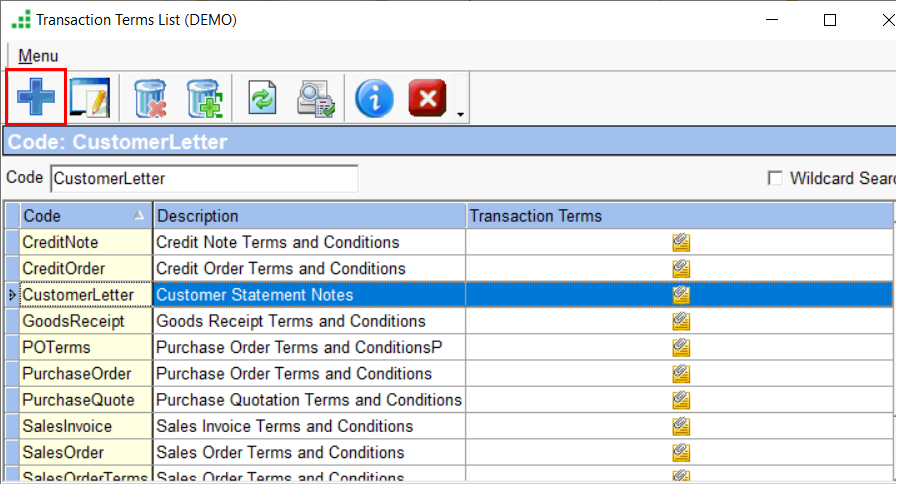
Step 2: On the Payment Terms List > Click (+) sign or use ‘Insert’ key on keyboard to create a new Payment Term. You can also go to Menu and select ‘New’.
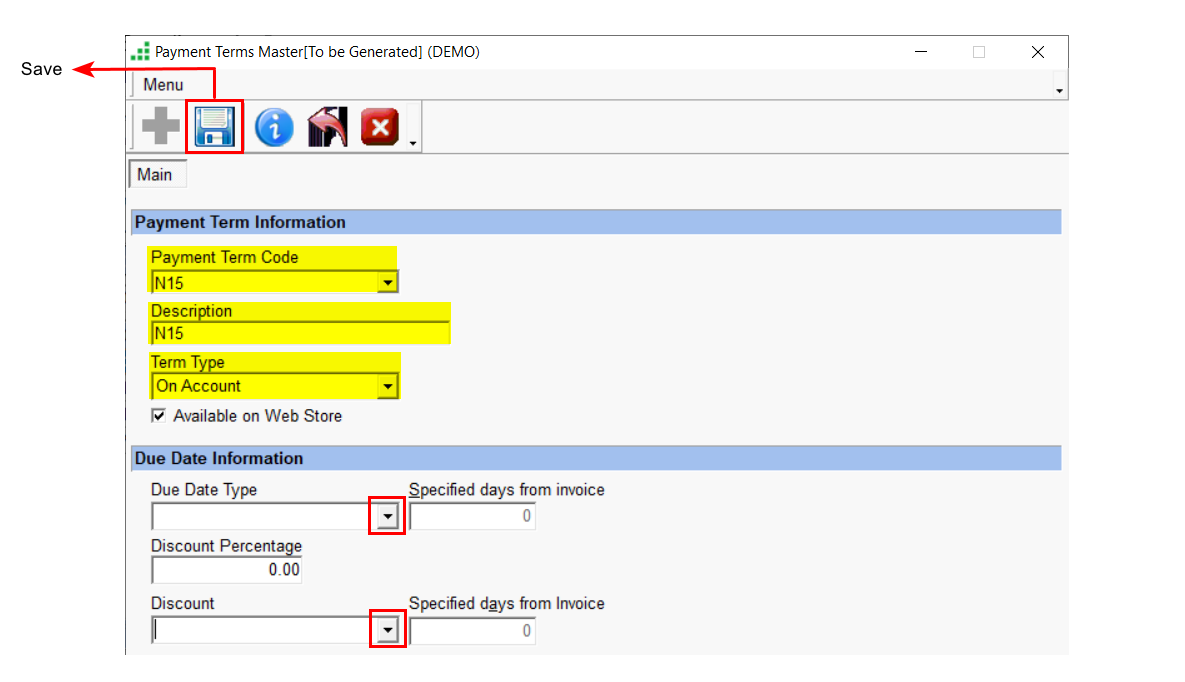
Step 3: Enter the Payment code, Description and select the account type. Select the option from the drop down list under the Discount field and enter the discount details such as Discount Percentage, number of days and click on save.
Applying the Payment Term to the Vendor
Steps to be Followed
Step 1: Go to Purchases > Masters > Suppliers.
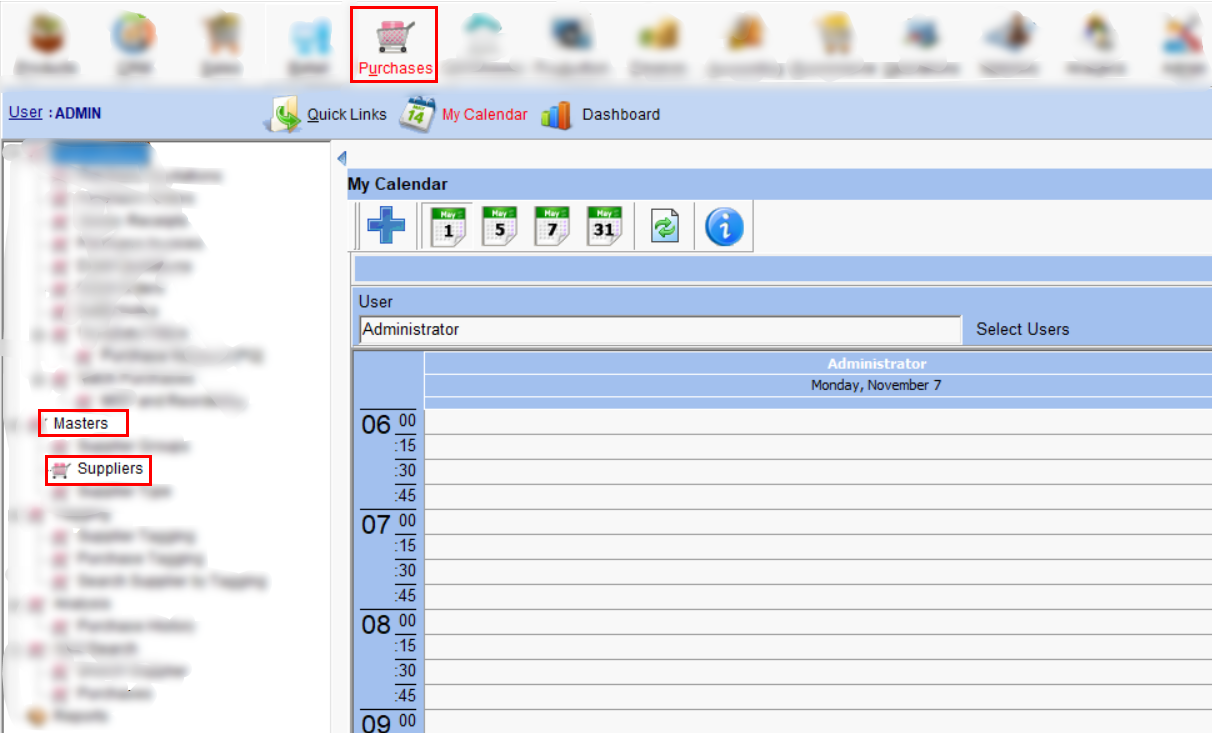
Step 2: Create a new Supplier or open the supplier available.
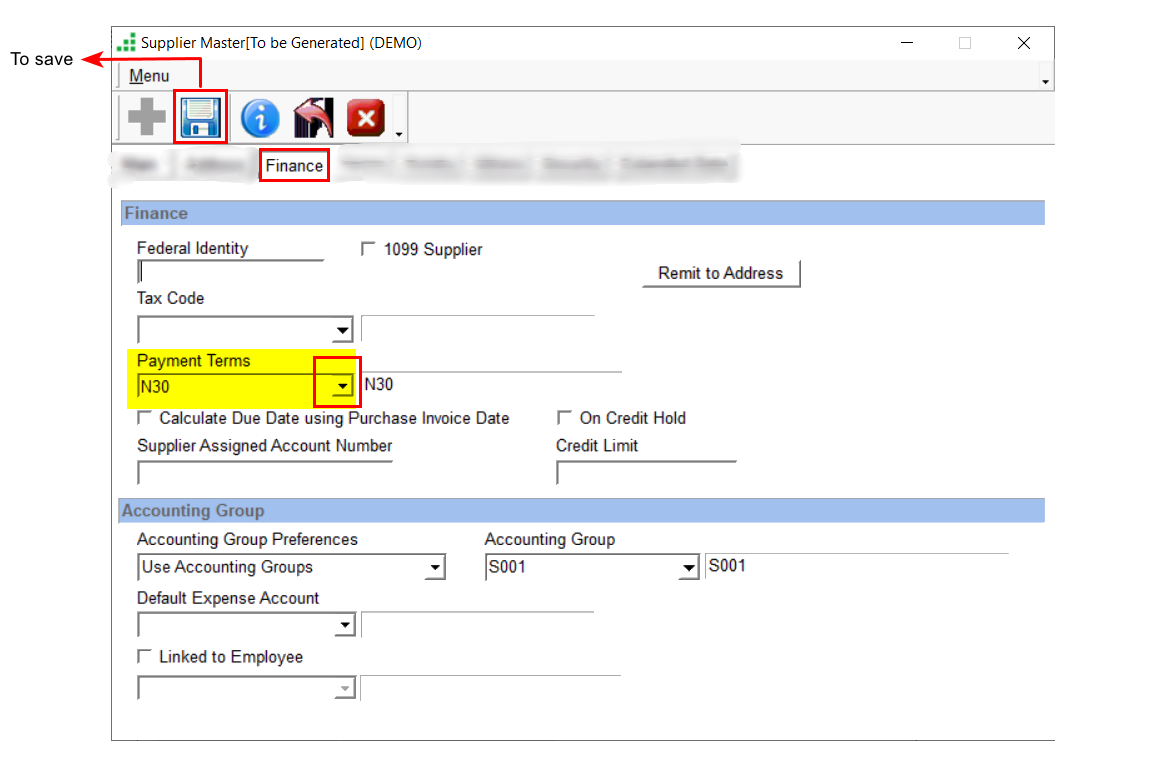
Step 3: Go to ‘Finance Tab’ and select this payment term from the drop down under the Payment Terms field and click on save.
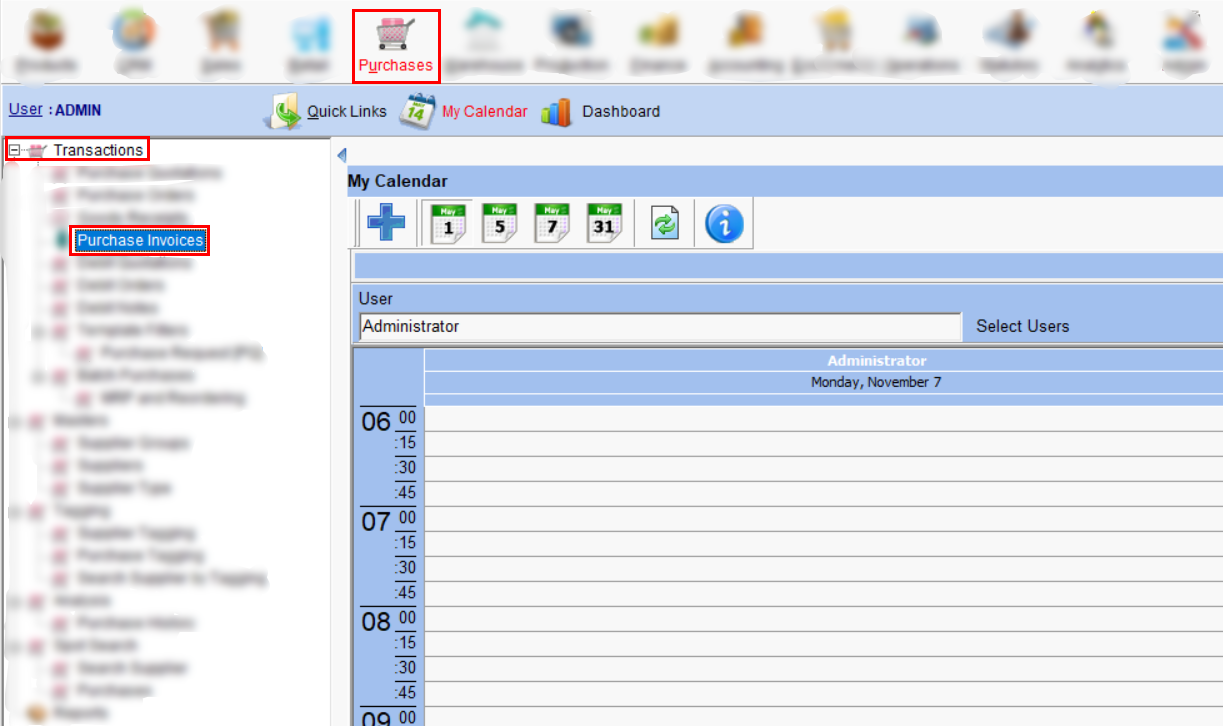
Step 4: Create a Purchase Invoice for this supplier. Go to Purchase > Transactions > Purchase Invoices.
Step 5: Go to Details Tab, under the Supplier details, the payment term that was assigned to the Supplier will get populated.
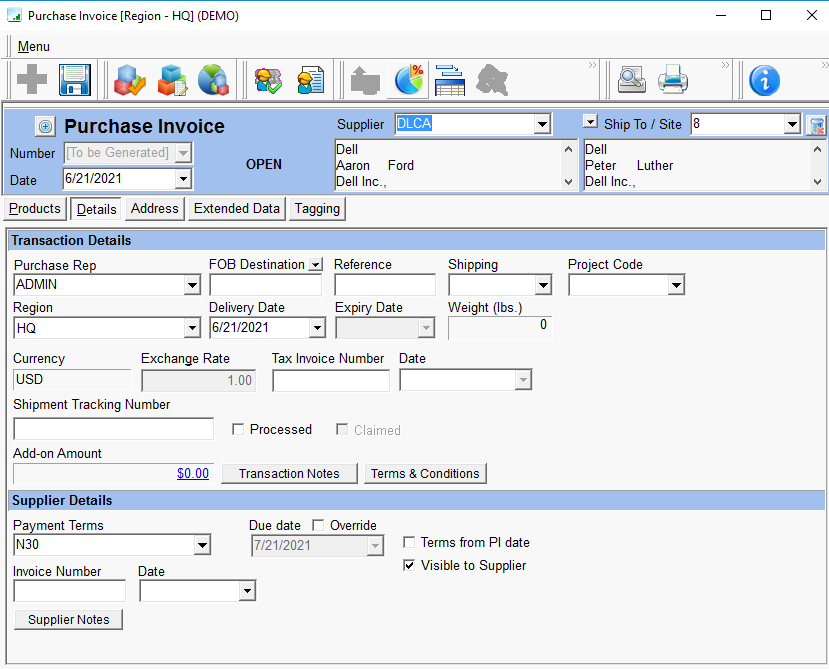
Step 6: Go to > Menu > Payment > Pay.
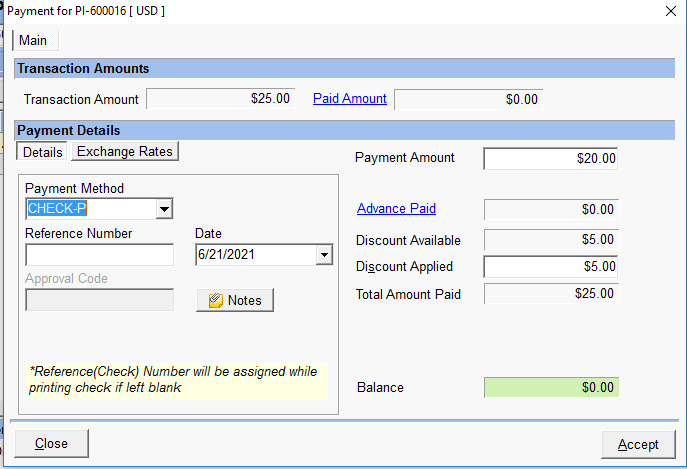
You can see that a discount of 20% is applied to the total Transaction amount($25) and the Outstanding amount is 20 after a discount of 5.
- In which Reports we can see this data…
- Which are impacted modules
- Review sample Use case scenarios or actions